| Home | Web Hosting | DSL | Dial-up | Help |

Setting up your Dial-up Connection
Why use Open Transport?
- OT is free, and available from Apple.
(http://www.apple.com)
- OT is fast, user-friendly, and stable.
- OT is required for Internet applications. (Not quite true, but
much easier than it's outdated alternative.)
Why use OT/PPP?
- OT/PPP is free, and available from Apple.
(http://www.apple.com)
- OT/PPP is fully compatible with Open Transport.
- OT/PPP is slick and easy to use, doing most things for you
automatically.
- OT/PPP now comes as an Installer option for Open Transport,
so if you have a relatively new version of Open Transport
(>1.1.1), you can install OT/PPP without having to download
anything else. (And if you're using an Open Transport earlier
than 1.1.1, upgrade! A lot of bugs were fixed.)
- OT/PPP is rumored to be slightly faster and more reliable than
it's (also free) competition FreePPP and MacPPP, for instance.
That said, if you're feeling ornery and don't want to use OT/PPP no matter what I say, you may still be able to get something out of this document. No matter what PPP client you use, the Open Transport TCP/IP configuration remains the same. Just keep in mind that the PPP client section isn't tailored towards rebellious people like yourself. =) However, if you're really in a grumpy mood and don't even want to use Open Transport, there's not a lot you'll get out of reading this. OT's alternative, MacTCP, has nothing in it's favor, and is not worth using or discussing unless you're sadistic. True, Open Transport does require you to be using System 7 but if you can't run System 7 or don't run System 7, then I still say you're sadistic. So there. =)
Oh, and in case you have no idea what software you're using, take a look in your Control Panels folder. If you see a file called "MacTCP" you're using MacTCP, and Apple and I say that means it's time to upgrade to Open Transport. If you see a file called "TCP/IP," you're already using OT. If you see neither, then you should install Open Transport. As for the PPP client, if you see a file called "PPP" and another called "Modem," then you're using OT/PPP, and you're set. If you don't see the files "PPP" and "Modem," but do see a file with the letters 'PPP' in it (say "FreePPP" or "SonicPPP"), then you're not using OT/PPP, but, like I said above, you may still be able to get something out of this document.
"Are we there yet?"
So, finally, let's talk configuration. There are three levels of software to configure. Most basic is the modem layer, which tells your Mac where to find your modem. On top of that is the PPP layer, which will tell your modem how to talk to Zipcon. Finally, there's the TCP/IP layer, which tells your computer how to talk to the Internet once it's connected to Zipcon.
Let's do the hardest level first (and trust me, it ain't that hard.) Open up your TCP/IP control panel. Go to the Edit menu and select "User Mode" Now, click on "Advanced" and hit Okay. Then click on the Options button. Finally, make the window that pops up look like this:
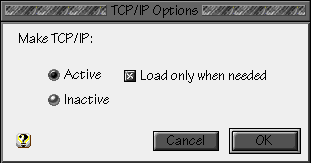
Note that it probably already looks like this, but change things if you
need to, and hit Okay.
Strictly speaking, what we just did isn't necessary, but once upon a time
a few people reported having some stability problems if they didn't do what
we just did, so what the heck. Stability is a good thing.
Now, make your TCP/IP window look like the one pictured below. (For those
who are taking things literally, you can't make your windows look exactly
like mine unless you have the extension Kaleidoscope, which, as you can
see, alters to the appearance of your windows. It does more, too
http://www.kaleidoscope.net)
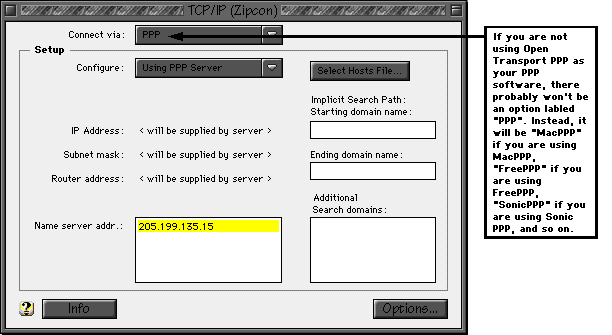
And that's it! You've configured your TCP/IP layer. Close your TCP/IP
control panel, and save the changes when it asks.
A note about saving passwords. According to the List of Things You Shouldn't
Do, writing down passwords or saving them like I have in the above picture
is a stupid course of action to take. The rationale is that, if somebody
gets access to your computer or goes through your stuff, they might well
obtain access to your computer accounts. This is inarguably true, so here's
my rationale for saving passwords anyway. If somebody has gained
access to my computer or is going through my stuff, that means they've broken
into my house, and at that point, I don't particularly care about my computer
accounts. Besides, I'm extremely lazy, and if you do save your password,
you won't have to re-enter it every time you login to Zipcon. (Just remember
to change your password here if you ever change it on Zipcon.... something
that's a good thing to do every couple months regardless of how pragmatic
you are.)
The first check box, to connect automatically when starting TCP/IP
applications, is a good idea to check. What it means is that, if you
start up your Web browser and you're not connected to the Internet at
the moment, your computer will automatically dial Zipcon and connect.
(For the techies out there: yes, Zipcon is Unix and therefore a command
line host, but remember that you're using PAP authentication, so there's
no need for a connect script.)
Now it's on to the PPP layer. Open up your PPP control panel. If you don't
fine a PPP control panel, look for a Remote Access control panel.
Make it look like the one pictured below. (Of course, you'll need to
type in your login name and password, not the one listed).
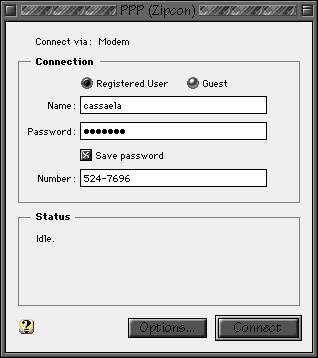
Well, now that that little discourse is over with, let's finish configuring
PPP. Click on the Options button, and then on the Connection tab. Here's
how I have mine set up:
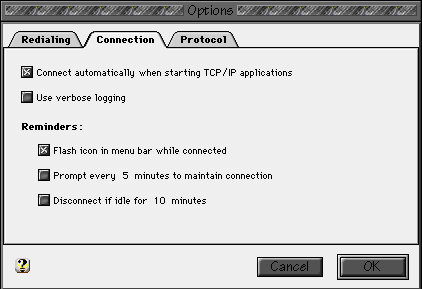
Verbose logging is useless unless you're trying to debug a connection;
leaving it off gives you a much less detailed, much longer (time-wise)
log file of connections.
Set your reminders however you wish; personally, I spend way too much time
online every day, so being asked every 5 minutes to maintain my connection
would heartily annoy me in the first 5 minutes. Also keep in mind that Zipcon
already disconnects you if you're idle for much more than 20 minutes, so
the 10 minute idle timeout seems redundant and (for me) too short a time
anyway.
Next, click on the Protocol tab. Things should already look like they do
below, but in case they don't, go ahead and change them.
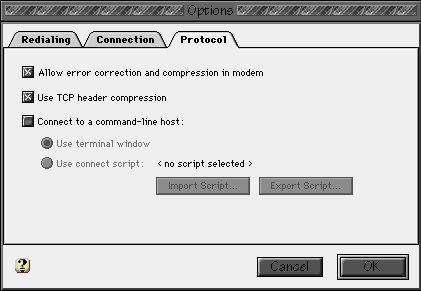
So that's it for the PPP/Remote Access control panel. Hit Okay, close the
control panel, and save the configuration changes.
Finally, there's the modem control panel. I won't cover it in depth, because
it's so straight-forward there's really nothing there to talk about. Still,
it has to be set up right, so open up the Modem control panel and verify
the modem is indeed connected to the correct port. (The "correct port"
doesn't have to be the modem port; there's nothing wrong with hooking up
your modem to the printer port, so long as you tell your Mac what port the
modem is on.) Turning your modem speaker on or off, or setting the modem
to dial tone or pulse, will have no effect on connecting to Zipcon.
Well, that's it. You shouldn't have to reboot, unless you haven't rebooted
since installed Open Transport and OT/PPP.
Please email your questions or comments to
support@zipcon.net or call 206-524-0612.